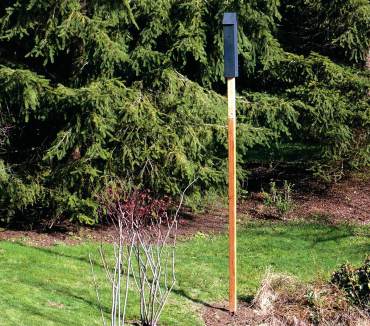
You may have heard that bats are wonderful for insect control. They certainly are — a bat can eat as many as 1,000 insects an hour. By devouring mosquitoes, crane flies and other pests, they protect crops and human health. In many parts of the world, they are crucial pollinators and can help regenerate rain forests by dispersing seeds. Besides their value to humans and ecosystems, they are also fascinating creatures to observe.
Unfortunately, bat numbers are declining in the Pacific Northwest and elsewhere in the world, with dire consequences to the environment. Most people think bats roost in caves, barns or bridges, which is true with some species, like the local Big brown bat (Eptesicus fuscus). But many Western Washington bats are forest dwellers — sleeping and raising their babies (pups, as they are known) in live or dead trees.
When people cut down trees and move into forested areas, they disturb the bats’ habitat. You can help by preserving trees and snags as well as by building bat houses. Pacific Northwest species that might use a bat house include Little brown myotis, Big brown bat, Long-eared bat, California myotis and Yuma myotis.
While there is no guarantee that your bat house will be inhabited, there are basic tips to improve your chances, most of which involve understanding that bats need heat — lots of heat — as well as open space around their dwellings.
- Put your bat house in full sun — the hottest place on your property (usually south- or west-facing) and preferably on its own, tall post, not on a building.
- Completely seal the house with caulk and paint with flat, black exterior latex paint so that it collects and holds heat.
- Place where entrance to the house is unobstructed so that bats have a wide, open area with which to safely fly in and out without bumping into things, and where predators cannot easily ambush them — 10-15 feet vertically and horizontally.
- Don’t use pesticides.
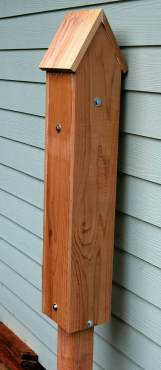
There are several styles of bat houses, but this article is about the Rocket-Box bat house, named as such because it resembles a bottle rocket. The idea behind a rocket box is that a bat roosting in one can move to whatever side of the house it wants in order to achieve maximum comfort. The south side of the house will be the warmest and the north side, the coolest. Bats can select their favorite spot at different times of the day and year. The best season to install a bat house is in late spring when bats are returning from migration or becoming active after hibernation.
Materials to get started
- 4-by-4 post, untreated, at least 5 feet long, with surface roughed up with a rasp
- 4-by-4 post, treated, at least 12 feet long, for sinking into the ground and securing with concrete
- Mounting bracket to connect the two types of posts (used for deck construction) or two 3/8-by-4-inch bolts with nuts, flat and lock washers to hold together notched posts
- Eight 3-inch lag bolts
- 1/2-inch or greater plywood or lumber
- Exterior-grade galvanized screws or nails
- Wood scraps to act as spacers (3/4 to 1 inch thick)
- Black, flat latex exterior house paint
- Shingles for roof, if desired
- Wood caulk (if you don’t have a caulking gun, buy a squeeze tube with application tip)
Tools for assembly
- Table, circular or hand saw (or find a hardware store that will cut the lumber for you)
- Miter box
- Tape measure
- Square
- Reversing screwdriver/drill combo
- Rasp or coarse sandpaper
Building the box
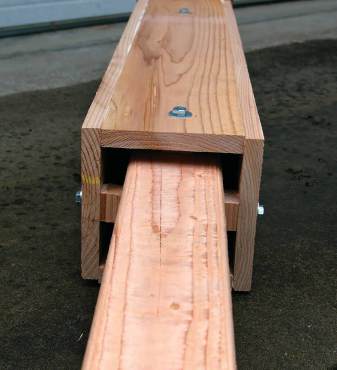
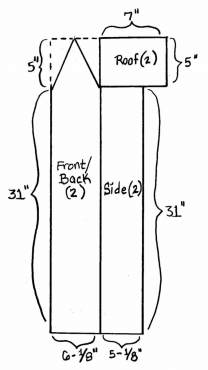
You’ll be cutting out two matching side boards that are 5-1/8-inch wide and 31 inches long; two matching front/back boards that are 6-1/8-inch wide and 36 inches long that you will cut into a peak; two roof sections that are 7-by-5 inches.
Using a miter box, miter one 7-inch edge of each of the roof sections so that they fit tightly together to form the peak. Bevel the top edge of each of the side pieces where they touch the roof overhang so that there are no air spaces.
Do not sand surfaces slippery smooth — bats climb rough surfaces more easily. Use a rasp or course sandpaper to rough up surfaces that will form the interior of the box, but remove splinters and round off harsh edges and corners to protect the bats’ delicate wings. Screw box together tightly with galvanized screws or nail with brads.
Tailoring the untreated post
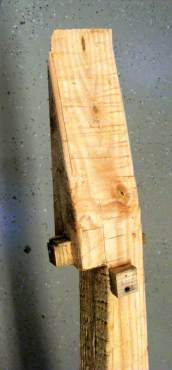
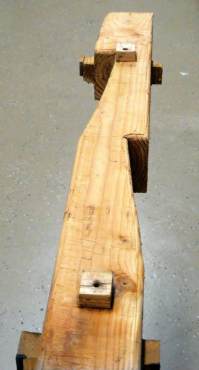
The top of the untreated 4-by-4 post should be cut at a steep angle where it meets the peak of the roof and the surface should be roughed up. Cut two angled notches out of the post to provide more space for roosting. When notches are cut, rough up the surfaces, sand down the hard edges and gently curve post corners.
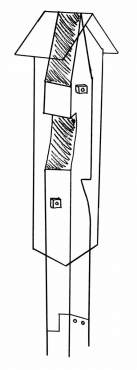
Cut 3/4-inch-thick wood spacers and glue to post. Slide box over the post and pre-drill through the box, spacers and into the post. Secure box to post with 3-inch lag bolts.
Once the box is secured to the post, caulk well wherever there is a seam, including under the roof overhang. When the caulk has dried, apply several coats of flat, black exterior latex paint and let dry.
Mounting the box
By notching the treated and untreated posts, you can connect the two with two bolts on each side. A mounting bracket can also be used.
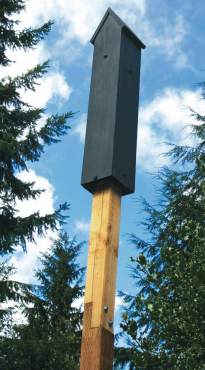
Sink base of treated post 2-3 feet into the ground and secure with concrete. Once the rocket box is mounted, be patient as bats don’t change roosts unless they have to.
Whether your box is inhabited or not, report your findings on bat forums so that others may learn from your experiences. And if you’re lucky enough for bats to choose your box, enjoy the show and the immediate benefits of nature’s pest control.
Bat Resources
Bats Northwest, Inc. • 206-256-0406 • www.batsnorthwest.org
Information on local bat species, their habits and conservation; website features building plans for rocket box and other styles bat houses, as well as resources on how to safely and humanely remove unwanted bats from buildings.
The Bat House Forum • www.bathouseforum.org
Connect and communicate with others who have bat boxes.
Bat Conservation International • www.batcon.org
Information on the conservation of bats worldwide, with books and DVDs on bat houses.




Comments