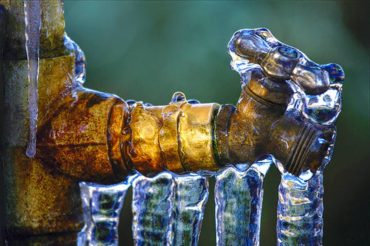
 Burst water pipes due to freezing can leave you, your family and your home in a state of crisis. When water freezes in your pipes, they expand, and that expansion can cause a rupture. Typically, the rupture doesn’t occur at the point in the pipe where it’s frozen but between the freeze and the faucet, bursting where the pressure has increased.
Preventing Frozen Pipes
If you live in an area not prone to freezing weather, frozen water pipes in your home may sound like a strange concept. Be warned, however, that even one freeze during the frigid winter months can result in repairs that can cost a small fortune. Some simple preventative measures can not only save you a lot of money, but the headache of winter season repairs.
Insulate: An obvious sign of diminished insulation — particularly in exterior walls — is mold. Not only is it important to insulate your home but you must insulate your pipes in crawl spaces and in your attic. You can use heat tape or thermostatically controlled heat cables to wrap pipes.
Follow manufacturer’s instructions for installation and use, and ensure you only use the products as intended regarding indoors or outdoors. It’s always best to use independently tested products by companies such as Johns Manville’s Industrial Insulation Group.
Seal air leaks: Air leaks that allow cold air to flow inside the house can lead to frozen pipes. Even small leaks can have a major impact.
Check areas where there are installations of washer/dryer vents, electrical wiring, jacks, cables and pipes. Use caulk or insulation to patch up any gaps. Also, apply weather stripping and caulk around crawl space doors and basement windows.
Disconnect hoses: Before the frigid temperatures of winter set it, disconnect all outdoor garden hoses and, if you’re able, use the indoor valve to shut off water to pipes that lead to outdoor spigots.
Set your thermostat: Even if you’re accustomed to turning your heat down at night, try to keep a slightly elevated ambient temperature during the day and night. Major drops in temperature overnight could result in frozen pipes.
Thawing Exposed Pipes
Exposed pipes are easier to inspect than internal ones, so perform a quick spot check of those first. You’ll need to move quickly to determine where a pipe has frozen before you make the determination to shut off the water and call in a professional plumber. Keep in mind that pressure will continue to build during the time you spend looking for the frozen section of pipe, and that may very well result in a rupture.
If you locate the freeze in the pipe and it’s accessible, there are several options for thawing. Keep your faucet running and use one of the following methods until water begins flowing at full strength. Take extreme care when using any electrical devices around water, particularly if it’s pooling. Use extension cords that have been properly rated and a ground fault circuit interrupter (GFCI).
- Heat lamps and space heaters: Use a heat lamp like those used to warm food or terrariums or portable space heaters, ideally more than one. Situate the heat close enough to the pipe but far away from any standing water and use aluminum foil to reflect heat off walls or surrounding surfaces. This should quickly work to thaw freeze in the pipe while you monitor the flow of water inside the house or check other pipes.
- Hair dryer: This is a common method for thawing frozen pipes, and one of the easiest. Apply the heat from the dryer to the end of the faucet and work your way backward. This will provide an escape for ice, water and steam while allowing the pressure from incoming water to clear whatever remaining ice is still in the pipe. Again, use precaution with the dryer and avoid contact with any water.
- Electric heating pads: Electric pads, blankets or even hot towels wrapped around the pipe can safely thaw a frozen pipe. Using multiple heating devices, starting at the faucet and moving backward, will be faster.
Thawing Enclosed Pipes
Enclosed pipes are a bit more difficult when attempting to identify and thaw a freeze. After you’ve checked the exposed pipes, you’ll need to check the pipes within your walls, floors and ceilings. In all likelihood, if the frozen pipe is enclosed, it’s within an enclosed outside-facing wall.
Turn up the thermostat: It’s time to heat the home. It’s possible — though somewhat unlikely — that cranking up the heat inside your house will thaw a frozen pipe. However, by taking this route, you will certainly slow down the expansion of ice.
Continue to test faucets in different areas of the house. If you locate a faucet with zero water flow, increase the heat in that area dramatically, especially if you have zoned heating.
Use infrared heat: If you’ve identified the area within the wall where the frozen pipe may be, aiming an infrared heat lamp at that area will be much more effective than a standard heat lamp. Infrared heat lamps provide more targeted heat that can penetrate walls.
Remove a section: Most homeowners are reluctant to start cutting into walls or ceilings, but you may need to do just that. By identifying were the frozen pipe sits, the removal of some drywall is far less expensive than repairing water damage. Once you’ve removed the drywall, use one of the listed suggestions to thaw the pipe.
Stay Frosty, Not Frozen
A tremendous amount of water can spill from a burst pipe and result in significant damage, which is why you must be on the lookout for frozen pipes and take action to thaw them immediately. A little prevention can go a long way.


Comments