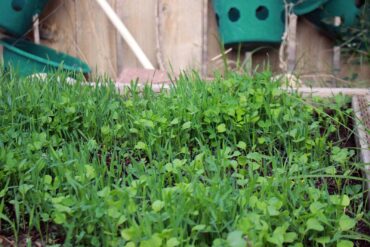
Put your garden to work over winter by planting a cover crop this fall. Covering the soil with plants that are turned into the soil or smothered and allowed to decompose in spring provides many benefits.
Fall-planted cover crops protect the soil from erosion over winter and reduce stormwater runoff into nearby waterways and storm sewers. They also help reduce weeds by forming a dense mat that increases organic matter, adds nutrients and improves the soil quality for your plants. These crops also help conserve soil moisture, and many provide welcome habitats for pollinators and other beneficial insects.
Oats, winter rye, winter wheat, crimson clover and hairy vetch are common fall-planted cover crops. The crimson clover and hairy vetch are legumes that can add a lot of nitrogen to the soil when they decompose. Try combining these with nonlegumes when possible. Consider purchasing a cover crop mix like the True Leaf Market no-till pollinator-friendly cover crop mix, which contains both and helps support pollinators.
Most cover crops go dormant over winter and resume growth in spring. Annuals like daikon radishes and oats are killed by cold winter temperatures. This makes oats a good choice if you want to get an early start to planting in spring.
Plant fall cover crops at least four weeks before the first killing frost to give them time to establish. Cereal rye is an exemption and can be planted right up to the first frost. You can plant the whole garden bed or just the area between vegetables that are still growing.
Remove any weeds, plants and mulch when planting garden beds. Loosen the soil and rake it smooth before seeding. Just remove the mulch, loosen and rake the soil between the rows of actively growing vegetables when planting cover crops in these spaces.
Check the seed packet for the amount of seed needed to cover the area you are planting. Spread the seed over the prepared soil by hand or with a broadcast spreader and gently rake the seeds into the soil. Make it easier to evenly spread tiny seeds by mixing them with compost and then spreading them. Once the seeds are planted, gently water using a fine mist.
Annual plants will be killed by cold winter temperatures, but the perennial cover crops will put on vigorous growth in late winter or early spring. Suppress this growth and kill the cover crop before it sets seed and at least two to four weeks before planting your garden. This allows microorganisms time to decompose the plant residue and avoid nitrogen deficiencies in spring plantings.
In spring, use your mower or weed-whip to cut the cover crop to the ground. You can till the residue into the soil at that time or cover the area with a black tarp for at least two weeks. Remove the tarp, then incorporate the residue into the soil or plant your vegetables through the dead plant remains.
Avoid working wet soil that can result in compaction and hard-as-rock clods, and take years to repair the damage. Do a moisture test before working the soil. Grab a handful of soil and gently squeeze. If it breaks into smaller pieces with a tap of your finger, it’s ready to work. If it remains in a mud ball, wait a few days.
Two weeks or more after the cover crop has been killed or tilled into the soil, you can begin planting. Planting any earlier can result in nutrient deficiencies that will require a light spring fertilization.
Adding cover crops to your gardening routine will improve the soil and plant growth and is good for the environment. Like any new gardening practice, it can take time to adapt it to your space, climate and gardening style. The cover crop growing guide at trueleafmarket.com can help. With time and experience, growing cover crops can soon become a part of your gardening routine.


